Video making and editing is a new trending skill of the 21st century. With the advancements in technology, it’s easy to shoot videos, edit them, and publish them all with just a phone. No one should lag in mastering it.
Many of our readers are into video editing, tutoring, gaming, and vlogging. Now and then, they have to record their Mac screen for recording gameplay, an instructional video, or some video that’s not allowed to download.
Without capturing the screen, tech videos wouldn’t even be helpful at all.
Whatever the reason might be, but knowing how to screen record on Mac is a skill that comes handy in various situations. However, not all of you know how to screen record on Mac, which is alright.
If you read the three methods we have written in this article, this task will be easier for you to perform. You don’t have to use all 3 of them though, pick the one that looks easy to you.
There are professional tools like VideoSolo Screen Recorder, but let’s see the other ways first.
Method 1: Use Screen-Recording Feature of macOS Mojave
Apple devices have been a darling of media folks and artists. Still, their affection for Apple’s products isn’t without any reason. The company always improves its products, which makes them highly reliable.
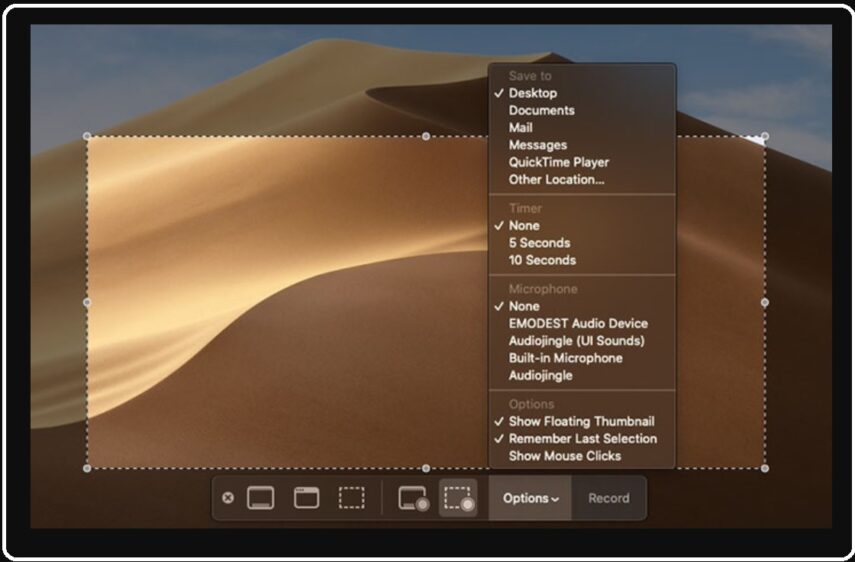
In September 2019, macOS Mojave was launched by Apple. With the launch of Mojave, it became easier to record screens on Mac products. This time Apple embedded the Screen Record feature in the Screenshot toolbar of macOS Mojave.
If you’re running macOS Mojave on your device, here’s the quick guide on how to capture the screen:
- Enter Command + Shift + 5 to open the screenshot toolbar on your Mac
- You can select the portion from the screen you want to record, select the part by:
- To capture the complete screen, you have to click on the ‘Record Entire Screen’ icon.
- If you want to capture recordings of a limited area, you may click on ‘Record Selected Portion’ to pick the area.
- Once you define the area for screen recording, click on the ‘Record’ option to start it.
- You can finish the recording if you click on the ‘Stop Recording’ icon provided in the menu bar. There’s another short trick to do it: Enter Command + Control + Esc.
- Once the recording of the video is finished, you are shown a thumbnail of the video on the screen, and you can cut the video or save and share it.
It’s that simple to record screens for Mojave users. However, if you’re not using Mojave or your Mac doesn’t support it, you need not worry about it. The remaining two methods we have suggested below are going to work too, even if you don’t have Mojave installed on Mac.
Method 2: Use QuickTime Player
The best things can sometimes be found in most unexpected places. Similarly, a software used for one purpose at a time can help us perform tasks that are not what they are made for. Only we need to know how to tweak it for our job.
QuickTime is a program used by Mac users to watch movie files. QuickTime, however, can perform a few less-known tasks: capture screen video, record audio(from the microphone), and webcam videos.
QuickTime can do these tasks, but it can’t record system sounds from the device, but there’s a software that can be paired with it to record screen video and audio. A QuickTime + Soundflower combo is all you need, here are steps:
- Get Soundflower installed on your Mac. Restart it after downloading is finished.
- Type ‘MIDI’ in Launchpad, to play Audio MIDI Setup on the Mac.
- Create a fresh ‘Aggregate Device’ by clicking on the ‘+’ symbol in the bottom left corner of your screen, check the ‘Built-in Microphone’ and ‘Soundflower(2ch) options from Audio Device list.
- Similar to ‘Aggregate Device’ you need to build a ‘Multi-Output Device’.
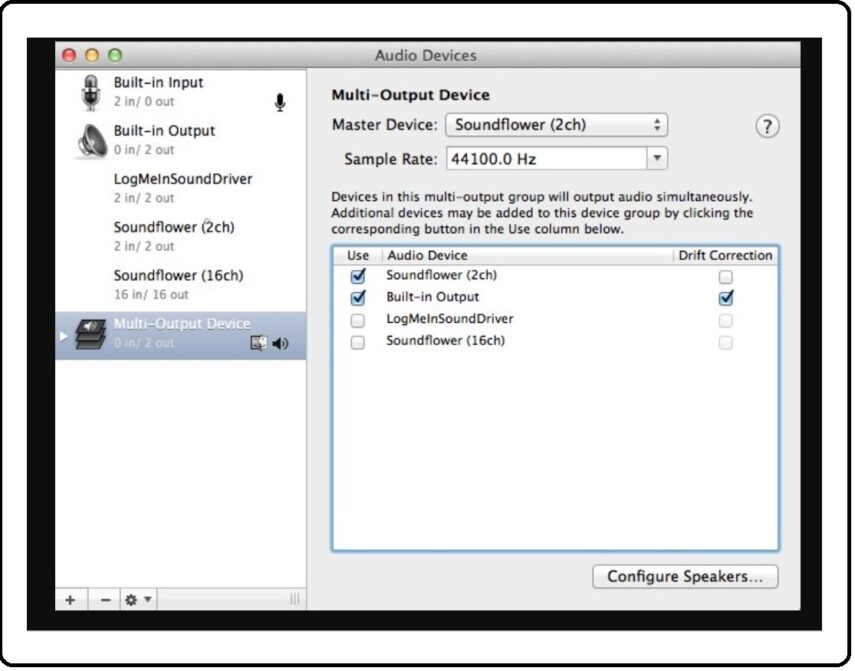
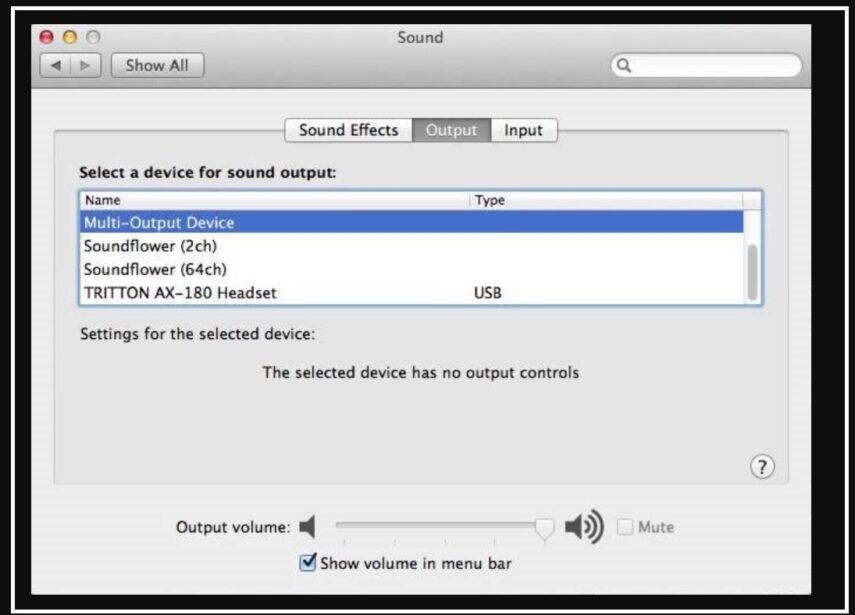
How to Screen Record on Mac - Then you have to visit the option of System Preferences > Sound > Output, and then choose ‘Multi-Output Device’. Similarly, you have to click on ‘Aggregate Device’ from the Input tab window.
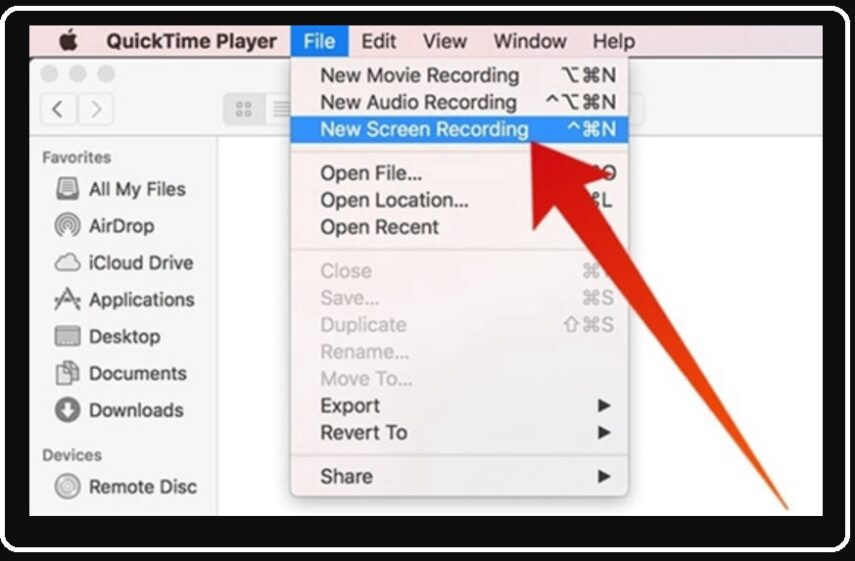
How to Screen Record on Mac - Once you have performed the above tasks, you need to open QuickTime application on Mac, click on File > New Screen Recording. Then it will ask you to pick ‘Aggregate Device’ from the microphone setup.
Hit that QuickTime record option to record the video and audio.
How to Screen Record on Mac
With the steps given above, you will start capturing audio of the system and microphone, and screen video at the same time. However, if you want to record only the sound of the system instead of the microphone, return to Step 6, select Soundflower(2ch).
Okay, we know it’s a bit on the nerdy side, but hey it works. Also, you should know that you can’t trim the video, as there is no editing tool for this method.
If you tried this and it doesn’t work well, you can always rely on the latter approach. It’s entirely professional compared to the second method.
Method 3: Use a Profession Screen Recorder Software
There are professional screen recorders like VideoSolo Screen Recorder that are quite helpful for those not having built-in screen recording feature on their Mac. There are many customized features you get with such software, and also an editing tool to edit the videos.
I agree they aren’t free, but then there’s no such thing as free lunch in the world.
Here’s a quick guide on using VideoSolo tool:
Install and Choose the Screen Part to Record
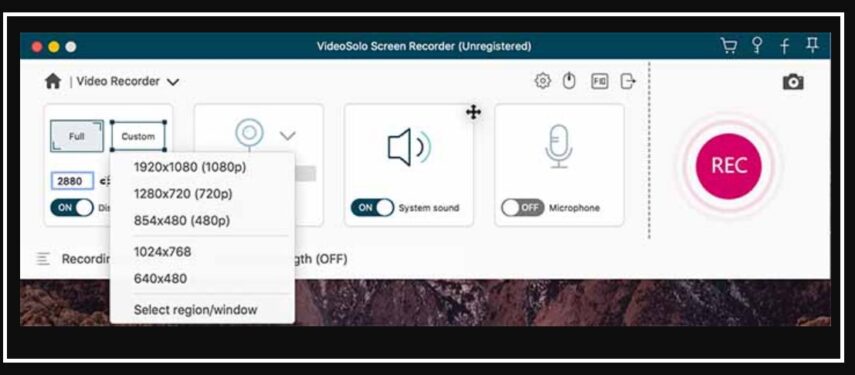
If you have decided to use this software, download and install it on Mac, select the option of ‘Video Recorder’. You’ll be required to select the part of the screen you want to record. You can also do other things like adjusting audio settings, starting a webcam for recording, etc.
Set Hotkeys and Start Recording
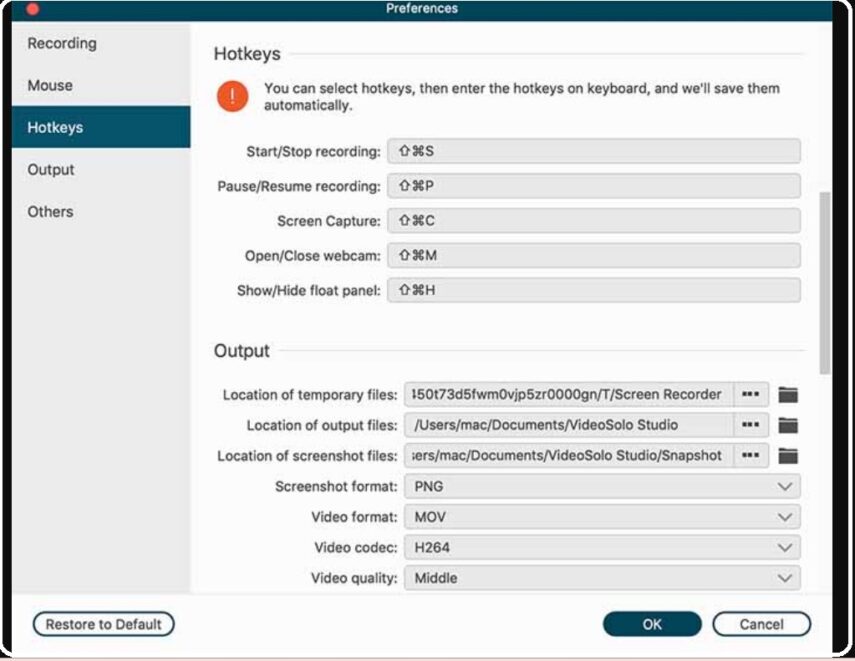
You can set Hotkeys to quick access. You need to remember the Hotkeys though. Finally, start the ‘REC’ button to record the screen. You can click on it to stop the recording.
You will get a preview from ‘History’.
Final Words
If you are a consistent user of video screen recording, it is better to get a professional screen recording app. It will save you time, and give you additional useful features. However, if you have macOS Mojave installed on your computer, you don’t have to spend money on how to screen record on Mac. The built-in recorder will do it for you.